French Toast Secrets: Mastering Soaking, Frying, and Flavor for the Best Breakfast
There are few breakfast or brunch dishes as universally beloved as French toast. The allure lies in its deceptive simplicity: golden-brown, crispy edges giving way to a warm, custardy interior, ready to be adorned with a myriad of sweet or savory toppings. While the ingredients are often kitchen staples, achieving truly stellar results – what many would call the
best French toast – is an art form. It's less about a complex recipe and more about understanding the fundamental techniques of soaking, frying, and flavor building. This comprehensive guide will unlock those secrets, transforming your morning meal from good to absolutely unforgettable.
The Foundation of Flavor: Crafting Your Custard and Choosing Your Bread
Every exceptional slice of French toast begins with two crucial components: the bread and the custard. Getting these right sets the stage for success.
The bread is arguably the star. While many recipes might suggest any bread will do, the secret to preventing a soggy, falling-apart mess lies in one key characteristic:
staleness. Fresh bread, with its higher moisture content, acts like a super-absorbent sponge, quickly becoming oversaturated and disintegrating when soaked. Stale bread, however, is drier and "thirstier," allowing it to absorb the custard evenly and hold its structure. Ideal choices include sturdy, slightly dense loaves like brioche, challah, sourdough, or even day-old artisan white bread. For those who prefer a gluten-free option, ensure it’s also a day or two old. An expert tip to make fresh bread "thirstier" is to lightly toast it before soaking, effectively drying it out just enough to become a perfect vehicle for the custard. For more insights on this, read our article
Perfect French Toast Every Time: Why Stale Bread & Heat Matter.
Next, we turn our attention to the creamy, flavorful custard. The core elements are eggs and milk. For the richest results, heavy cream or whole milk are excellent choices, imparting a luxurious mouthfeel. However, plant-based milks also work beautifully, offering a dairy-free alternative without sacrificing texture. From this base, the possibilities for flavor customization are endless. Classic sweet additions include vanilla extract, ground cinnamon, a pinch of nutmeg, and sweeteners like white sugar, brown sugar, maple syrup, or honey. These are not strictly essential, so feel free to adjust to your preference – craving French toast without vanilla? Simply omit it! For those adventurous palates seeking a savory twist, consider incorporating grated Parmesan cheese, fresh parsley, salt, and pepper into your custard. Some chefs even suggest a dash of mushroom powder for an umami depth. When adding chunky flavorings like mashed banana or spices, ensure they are thoroughly blended into the custard. An immersion blender can be a helpful tool for achieving a smooth, uniform consistency, preventing any gritty surprises. Remember, if you're adding liquid sweeteners like maple syrup to the custard, you might want to slightly reduce the amount of milk to maintain the ideal consistency.
The Art of Soaking: Achieving that Custardy Interior
Once your bread is ready and your custard is perfectly mixed, the crucial step of soaking begins. This is where the magic happens, transforming dry bread into the custardy delight that defines the
best French toast. Pour your prepared custard into a shallow pan or baking dish. A sheet pan with a lip or a casserole dish works wonderfully, allowing ample surface area for the bread to lie flat.
Place your slices of bread into the custard, making sure both sides come into full contact. Turn the bread over several times to ensure every inch is evenly saturated. This isn't a race; patience is key here. Avoid rushing this step, as it takes time for the bread to fully absorb the liquid. The goal is for each slice to feel like a "heavy, sodden sponge" – substantial and weighty, perhaps even dribbling a bit when lifted. This visual cue indicates proper saturation. If your bread feels too light or still dry in spots, it needs more time. For an even more indulgent experience or for convenient make-ahead breakfasts, you can soak your bread overnight in the refrigerator. This extended soak guarantees maximum flavor and an incredibly custardy texture throughout. Different types of stale bread may require varying soaking times; denser loaves will need a bit longer than lighter ones to achieve that perfect saturation.
Frying to Perfection: Crispy Edges, Cooked Through
With your bread perfectly soaked, it's time to bring the heat and achieve that coveted golden-brown, crispy exterior without compromising the custardy interior. The frying stage is where careful attention to temperature truly shines.
Start by melting butter in a large skillet or griddle over medium to medium-high heat. Butter not only prevents sticking but also imparts a rich, nutty flavor that is synonymous with the
best French toast. Some chefs prefer to mix butter with a neutral oil (like canola or grapeseed) to raise the smoke point and prevent the butter from burning too quickly, especially if you're cooking multiple batches. Once the butter is melted and slightly foamy, carefully place your soaked bread slices into the pan, ensuring not to overcrowd it. Overcrowding can lower the pan's temperature, leading to steaming rather than frying, and uneven cooking.
Cook each side for approximately two to three minutes. The key here is consistent, moderate heat. If the heat is too high, the outside of your French toast will burn quickly, leaving the center raw and undercooked. Conversely, if the heat is too low, the French toast will take too long to cook, potentially becoming greasy and losing its desired crispness. The ideal temperature ensures that the saturated bread cooks all the way through, setting the custard within, while simultaneously developing that beautiful golden-brown crust. You'll know it's ready to flip when the bottom side is a deep golden hue and the edges appear set. Once flipped, cook for another two to three minutes until the second side matches. The finished product should be uniformly golden, slightly puffed, and delightfully crispy on the outside, with a warm, soft, and custardy center. This balance is what makes for
How to Make the Best French Toast: Crispy, Custardy Perfection.
Elevating Your French Toast: Toppings and Troubleshooting
Frying your French toast to perfection is a victory in itself, but the journey to the
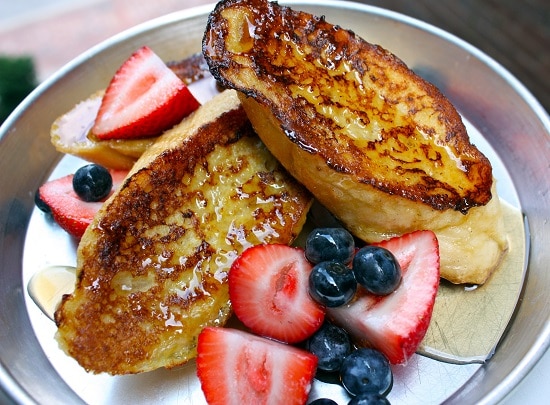
best French toast often culminates in the delightful array of toppings. The classics are perennial favorites for a reason: a dusting of powdered sugar, a generous drizzle of warm maple syrup, fresh berries (strawberries, blueberries, raspberries), sliced bananas, or a dollop of whipped cream. But don't shy away from creative embellishments! Consider fruit compotes, chocolate chips, a spread of Nutella, a sprinkle of toasted nuts, or for a delightful sweet-and-savory contrast, a side of crispy bacon.
Even with the best intentions, cooking can sometimes present challenges. Here are a few common snafus and how to troubleshoot them:
- French Toast Falling Apart: This is often due to using bread that's too fresh, leading to oversaturation. Ensure you use stale bread or lightly toast fresh bread beforehand. A custard that's too thin (too much milk relative to eggs) can also contribute.
- Burnt Outside, Raw Inside: The culprit here is almost always heat that's too high. Reduce your cooking temperature to medium-low or medium and cook for a slightly longer duration. Insufficient soaking can also mean the inside won't cook properly before the outside burns.
- Soggy or Greasy French Toast: If your French toast is soggy, it might not have been cooked long enough to set the custard, or the heat was too low, causing it to absorb too much fat. Ensure your pan is adequately hot and cook until golden and firm. If it's greasy, you might be using too much butter or oil in the pan, or the pan wasn't hot enough to begin with, allowing the bread to soak up excess fat.
By understanding the simple science behind each step, you can proactively avoid these issues and ensure every batch is perfect.
In conclusion, crafting the
best French toast isn't about an unattainable gourmet recipe; it's about respecting the process and mastering a few fundamental techniques. From selecting the right stale bread and creating a well-balanced custard, to patiently soaking each slice, and frying with precise heat control, every step plays a vital role. Embrace these secrets, experiment with flavors, and you’ll consistently achieve that irresistible combination of crispy edges and a custardy interior that makes French toast a timeless breakfast favorite. So, go forth, and transform your kitchen into a haven of delicious possibilities!